The swap is simple, here’s how it’s done.
After removing the medallion try using a large pair of side cutters to pinch the roll pin that secures the old yoke to the column tube and lever it out toward the bottom. If that doesn’t work, use a long #40 bit to drill completely up through the center of the roll pin. Enlarge that hole from the top with a long 3/16″ bit until you just touch the pin. Now get some spare lumber, one piece across the seat rails, another from that piece to the column for support. With a long punch, drive the roll pin down and out of the grip. Squirt a short burst of some WD-40 or PB-blaster to the center area to help with removal. Next apply a heat gun to that same area and leave it there for a couple minutes. I haven’t tried a hair drier for this but I fear it would be inadequate. The heat gun I use is suggested for heat shrink tubing, $40 or so. The heat may damage the finish on the yokes so be careful. The long drill bits are necessary for the drill chuck to clear the top of the Comanche yoke.
This next sounds a bit crude but it works for the removal phase, so far you have just been getting ready. Using a piece of heavy lumber a foot and a half long, I use a yellow pine 2×4, but not light-weight white pine, have your helper [who will probably be sitting on the wing out of your way, or at the stabilator] position the columns almost fully aft but not quite against the stop. Lay the aforementioned crude implement on top of and in constant contact with the column tube, sharply sliding it from forward to rear which should impart sufficient energy to the grip to remove it. It will take several sharp blows to remove the yoke; once the yoke moves assist by twisting and pulling action.
Compare the distance [hole-to-end-of-the-tube] between the new yoke and the old tube before you start the installation, your column tube may need to be shortened. The installation is to heat the yoke after applying some of the chosen spray stuff to the yoke bore and column. A helper can hold the opposite grip while one quickly installs the new yoke with a twisting motion, aligning the pin holes. Drive the roll pin upward into the aligned holes, but use some inertia-absorbing mass on top of the column so as to avoid transferring that shock load to the airframe. I use a small lead-shot bag [5-lbs works] which hangs there nicely by itself.
Possible Problem to Watch For
While removing yokes from their tubes I have seen Loctite used by Piper which suggests that some may again need this. If you discover you have a less-than tight fit on the column tube, use the “Loctite” but clean the shaft and bore and leave out the WD-40 stuff. You’ll have to be swift with the pin-to-hole alignment! If a roll pin feels un-tight when driven, again try the Loctite trick applying to the roll pin.
Another possible problem is hole misalignment like the tube is too long. If you need to shorten the tube to make the holes align try this. To avoid a mess inside the airplane you’ll need a 5-gallon plastic pail, 1-3/4” or larger hole saw, and a sanding disc for your electric drill. Use the hole saw to cut a hole in the bottom of the pail, place the pail over the column tube, use the sanding disc inside the pail [which will retain the trash] to remove material from the end of the tube. Be sure to put a mark on the tube to indicate the stopping point for material removal. De-burr the edge of the tube and continue. Measure the hole location before you start the installation and you won’t have a learning curve repeat session.
Be sure to leave the “bucket with the hole in it” somewhere inside the hangar so as to generate an occasional question. Strong solvents may damage the powder coat finish.
Pertaining to the approval for installation of these “C” model Comanche rams horn yokes. Take a look at the pages from the parts catalog which I have included here for your convenience.
For reference #1 which is the yoke, you’ll see in the note “B” at the bottom of the second page that the solid yoke is no longer available, order “yoke type” [which is now NLA either] 26665-02 as a replacement.
This means a 337 is not required, just a simple log book entry per this reference.

Try this for your log book entry
Removed original Piper Control wheels P/N 20965-000 from pilot and co-pilot sides. Installed control wheels Piper P/N 26665-002 [alt 494-579] [ with switches for etc ] at the pilot’s and co-pilot’s position. All work performed and using methods found with reference to the Piper Comanche Parts Catalog specifically note B page 2K4, and the Piper Comanche service manual 753-516, 9th Revision dated August 15, 1998, Weight and balance not affected. An operational check was performed and found to be satisfactory.
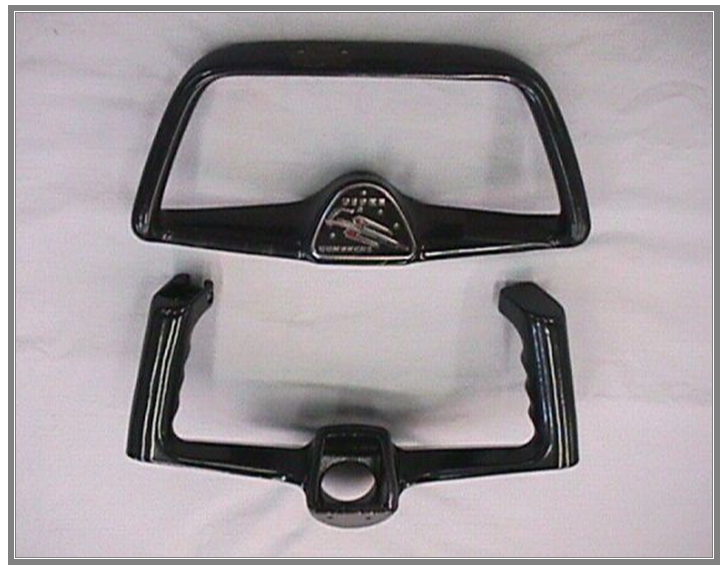
Comanche versus rams horn yoke – notice width comparison
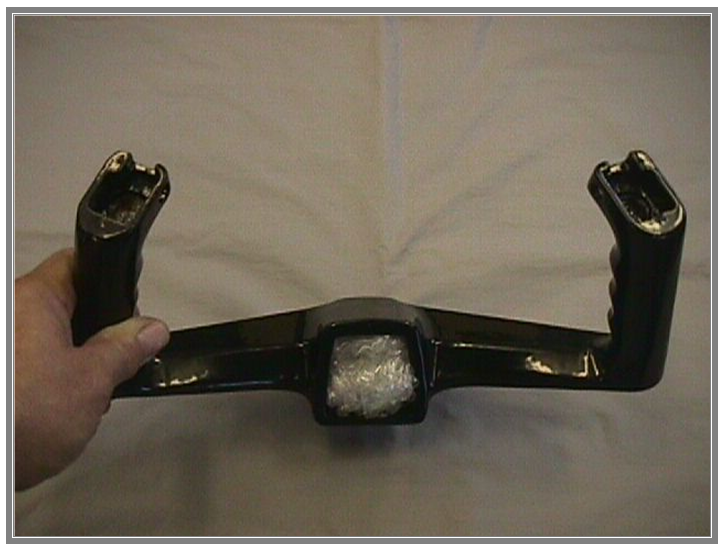
Piper Rams Horn Style Yoke with double hollow grips; these are difficult to find, Shown here powder coated glossy black
Good Luck, call if you have any questions.
Per the medallions, they are available for $28.25 each from https://www.engravers.net/yoke.html
Contact Comanche Gear
Please provide your complete details for invoicing such as your Card Billing Address, Shipping Address, and Aircraft Information. If you want to gab on the phone don’t hesitate to call, especially if you want to order something. If you have a problem-solving dilemma I can help with that too. This website doesn’t have internet ordering capabilities; that is for those more sophisticated. My email isn’t shown here because of scam artists and other shenanigans.
